|
|
▶ PFO DIANOSIS USING PMD
DOPPLER WITH BUBBLE CONTRAST
-----------John White,
BS, VT Spencer Vascular, Seattle WA
▶ PROCEDURE
- The following components
are required for the Right-to-Left cardiac/pulmonary
shunt test.
- Materials :
- Spencer Technologies PMD-100M
- Headframe with bilateral ball probes and cables.
- 2Mhz Spencer Technologies handheld probd.
- 18-21G¾X12" Vacutainer (Blood Collection
Set) with tubing.
- (3) 10ml syringes (Luer-lok system)
- 3way large bore stopcocks
- (2) 21G (syringe draw) needles
- (3) 10ml single-dose 0.9% NaCl (normal saline)
- (Several) Sterile cotton balls
- Tourniquet
- (Several) Gauze (4X4 or 2X2)
- (Roll) Paper tape
- (18X24) Sterile drape
- (18X24) Plastic tray
- Rubber gloves
- Valsalvometer (gauge in mmHg up to 100)
- Disposable mouthpiece (for Valsalvometer gauge)
▶ Setting Up
Start the PMD Doppler setup by probing the temporal
windows, bilaterally with the 2Mhz handheld probe
for the middle cerebral arteries. The patient
can either be sitting up or supine during MCA
insonation. This will guide you for placing/securing
the ball probes in the patient and secure snuggly
yet comfortable for the patient. Place the right
and left specific ball probes into the knob locking
mechanism and tighten down when desired signal
is reached. Plug bilateral cables into the ball
probes and advance to monitoring. Guide the patient
to a supine position on a bed or gurney. Allow
30 minutes of uninterrupted spontaneous cerebral
micro-embolus monitoring before starting intravenous
line.
During 30 minute monitoring, you can have the
patient practice a Valsalva strain by having the
patient blow on the Valsalvometer to 40 mmHg and
holding it for 10 seconds.
Notice the MCA velocities drop during this test.
Also prepare the materials needed for starting
an IV line and contrast injection syringes. |
|
|
▶ To Set Up a Sterile Field
Tray :
Use latex or nitril gloves when preparing materials
for sterile field. Open a sterile (18X24) drape
and place on tray of similar size. This will be
the sterile field in which you are going to place
the syringes, needles, Vacutainer set, 3way stopcock
and cotton balls.
Open three syringes, Vacutainer, 3way stopcock
and 21G needle in individually and let items freefall
to the sterile tray lining. Salvage packaging
of Vacutainer and stopcock for which you will
be using to hold loaded (drawn) syringes and stopcock
Place the 21G needle on the syringe, remove cap
and draw 9cc of NaC1 (normal saline). Repeat this
for multiple contrast injections. Place loaded
syringe(s) into open stopcock packaging for which
this remains sterile. |
|
|
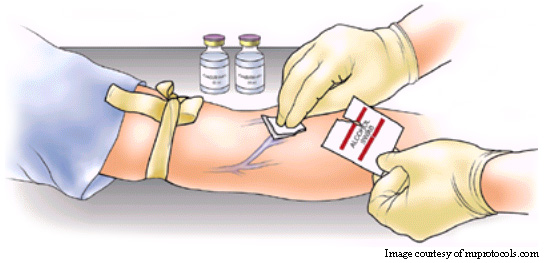
▶ Preparing Arm :
Often the antecubital fossa is chosen because
there is a large antecubital vein easily accessible
there. For agitated contrast injections generally
21-gauge is a good compromise, which is a sufficient
caliber for fast injections but still small enough
to be easy to insert.
Patient is supine. Apply a tourniquet high on
the upper arm. It should be tight so that it visibly
indents the skin but without causing patient discomfort.
Have the patient squeeze their hand to make a
fist several times in order to maximize venous
engorgement. Now start the search for a suitable
distended subcutaneous vein. If you cannot see
any veins popping up from the distention caused
by the tourniquet, you can sometimes feel them
by palpating the arm.
Once a suitable vein is found, then it is necessary
to clean and disinfect this area by swiping several
times in a circular outward motion with alcohol
wipes or alcohol saturated cotton balls. |
 |
|
|
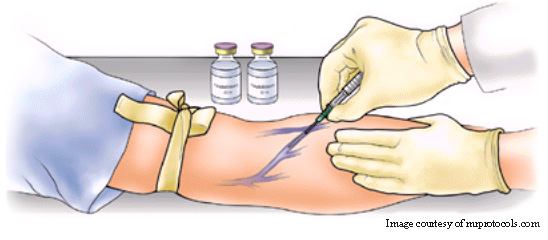
▶ Puncture Vein :
| Use one hand to apply counter tension against
the skin. This hand will be pulling the skin distally
towards the wrist in the opposite direction the
needle will be advancing. Connent the Butterfly
set tubing (12 inches long) to the 3way stopcock
and turn the long arm 90-degree to the tubing
(this allows flashback of blood into the tube).
Hold butterfly set at a 45-degree angle and use
a quick, jab motion to minimize patient discomfort.
Then advance the butterfly needle well into the
vein and look for the dark red flashback of blood
in the tubing to the stopcock. Turn the stopcock
back to the off position of the tubing (back 90-degrees).
Release the tourniquet. Secure the butterfly
set with tape over the actual skin puncture site
using a strip of tape and then the butterfly portion
to prevent accidental removal. You can test the
IV by injecting saline. Thers should be no resistance
of stinging complaint by the patient. |
 |
|
|
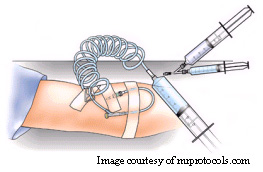
▶ Preparing for Injection
:
| Attach one 9cc loaded saline syringe and one
empty syrings with 1cc of air drawn to the Luer-lock
ends of the 3way stopcock. With the saline syrings,
open the stopcock to that syringe and flush blood
column from tubing with a little saline and then
draw back a small amount of the patient's blood.
Then close the stopcock once again. Start agitating
(1ml air/9ml saline exchange) by alternating the
contents of the syringe back and fourth ten
times while hearing a swooshing sound of the
mixture. The contrast injection is now ready. |
 |
|
|
▶ Injection :
---* Make sure the PMD-100M
is recording during injections!
1st Injection : Open the stopcock
to the tube (patient). While holding the syringe
outlet in the up position with the foam surfaced,
begin injection as a bolus (<3 seconds). Confirm
intravenous injection by positive findings on
the PMD screen. If negative, ask patient of a
stinging sensation around the puncture site and
then monitor ipsilateral subclavian vein with
a separate Doppler probe during injection to confirm
bubbles in the vein.
2nd Injection : Repeat injection with
a Valsalva strain. Contrast agent will be injected
five seconds before the start of a Valsalva
strain. The patient should start the Valsalva
strain on examiner's command. For Valsalva strain.
The patient should start the Valsalva strain on
examiner's command. For Valsalva strain, have
the patient blow/push on the mouthpiece of the
Valsalvometer and bring the needle up to 40mmHg
and maintain constant for ten seconds (a
dramatic decrease in MCA velocities insures and
optimal Valsalva strain). Count off the seconds
for the patient and instruct them to release when
appropriate. A hyperemic MCA velocity response
is normal.
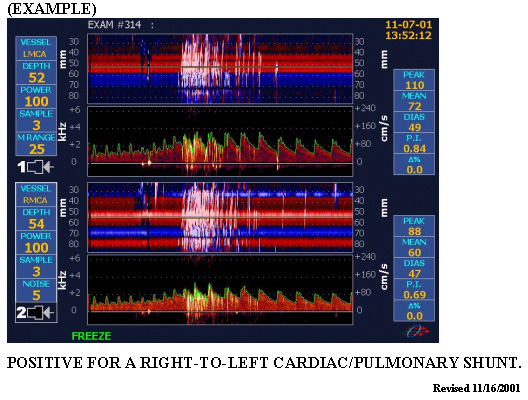
PMD Real-time results :
Positive for Right-to-Left cardiac/pulmonary
shunt = several microembolic signals appear on
the PMD screen.
Negative for a Right-to-Left cardiac/pulmonary
shunt = zero microembolic signals appear. |
|
|
|